 |
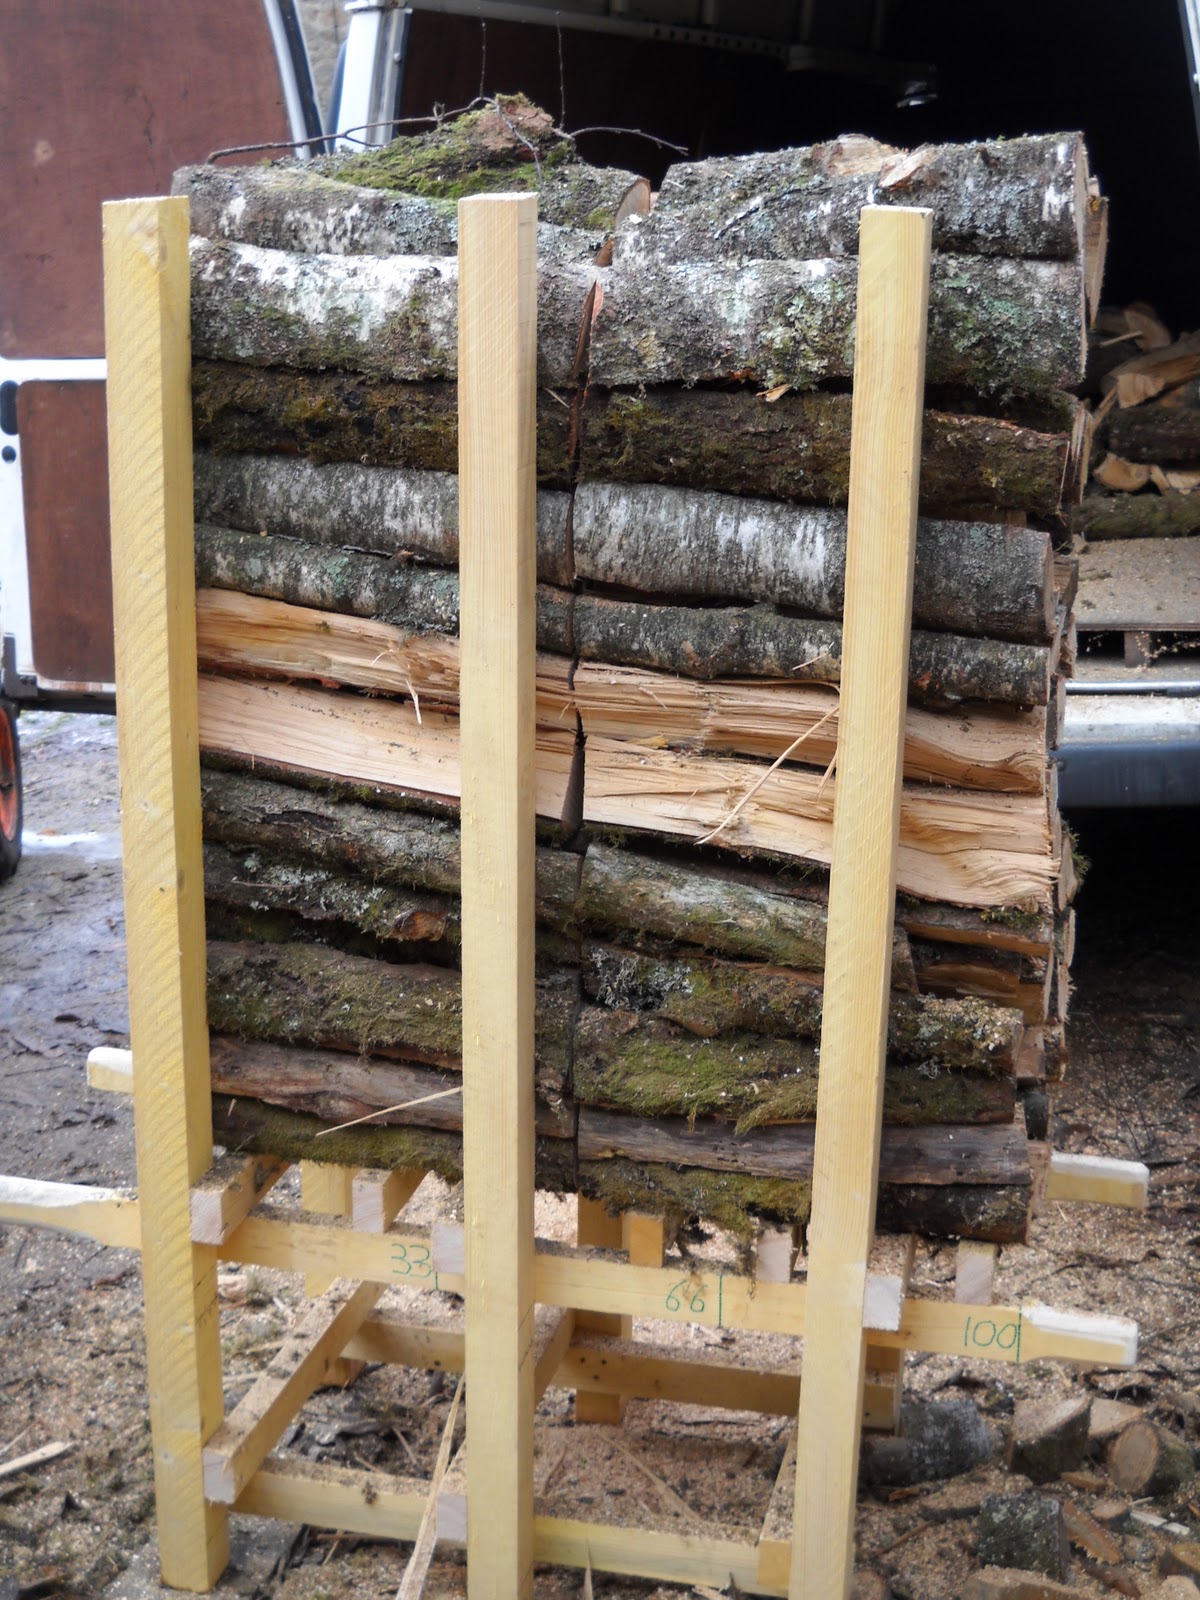
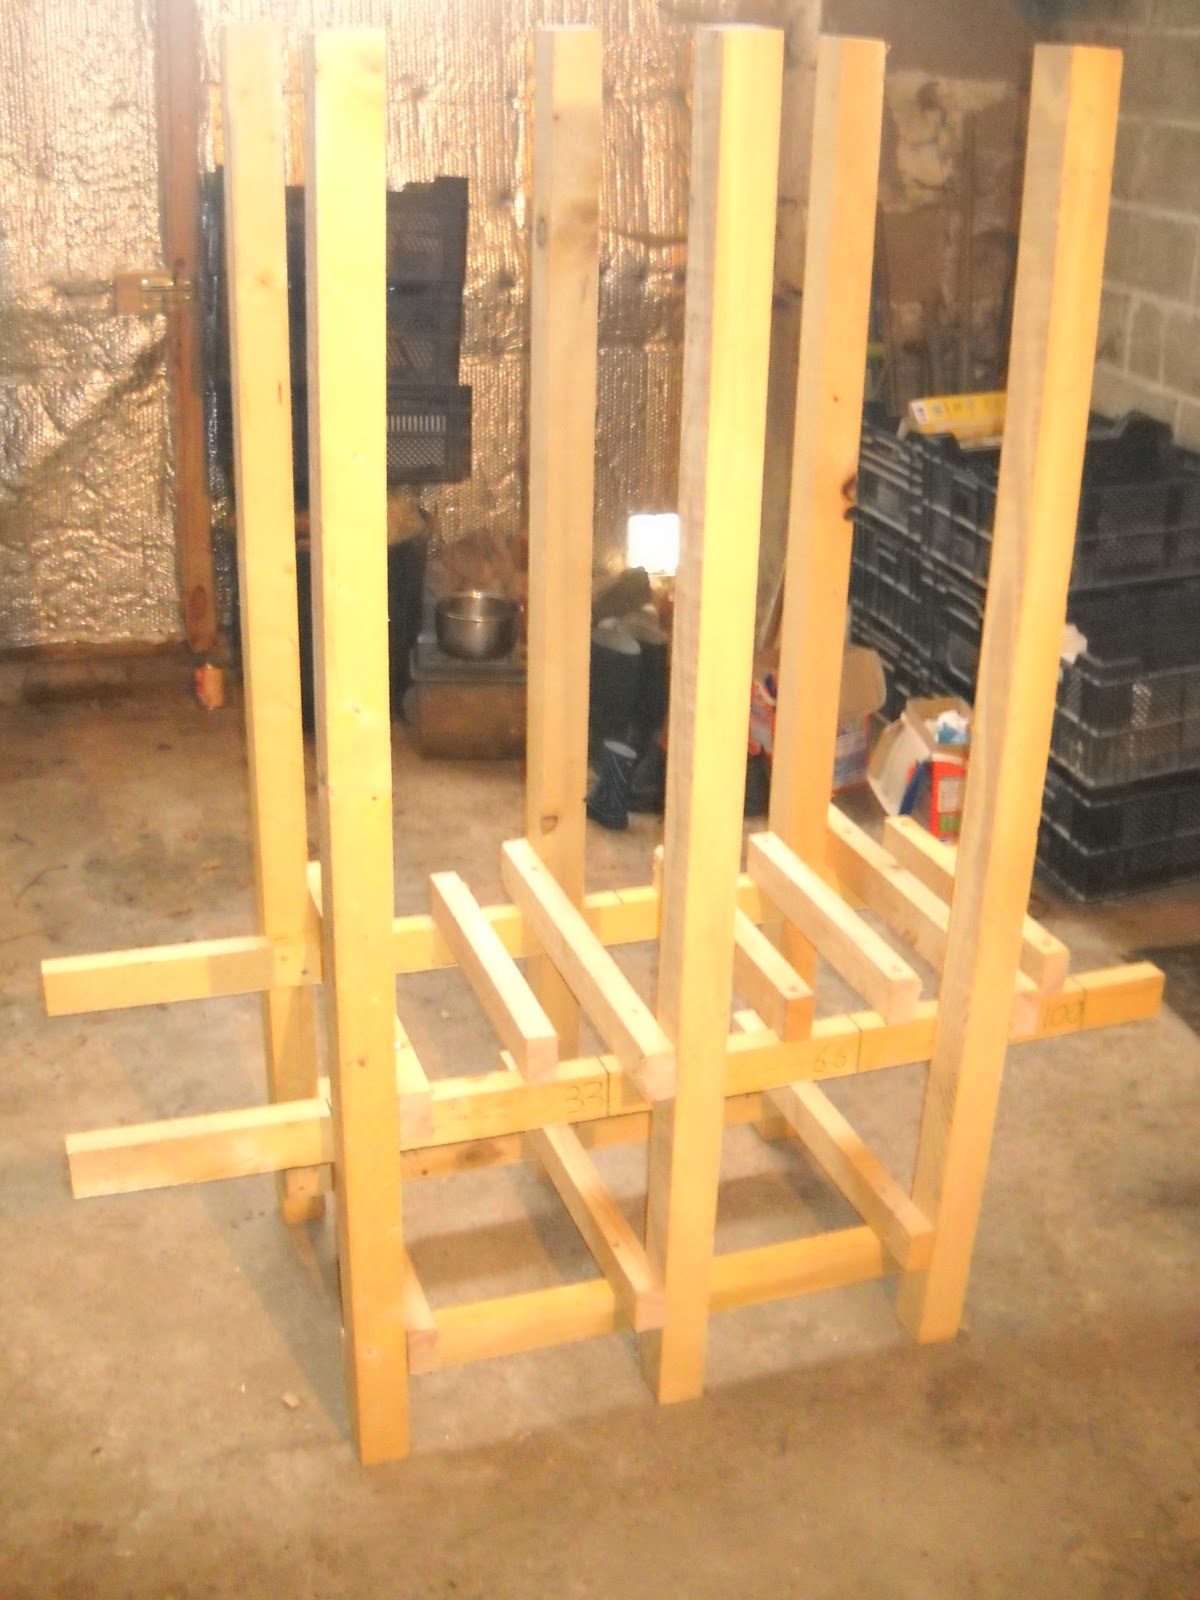
| The finished log cutting frame loaded with 1 meter logs that have just been cut at 50cm. The 50cm cutting position is on the opposite side of the frame where the chainsaw can fit easily between the supporting legs to give the maximum width of cut. |
When I moved to this part of rural France I found that almost everyone used wood as a source of heat during the winter months. Firewood is almost always cut into 1 meter lengths for stacking and drying before being cut into shorter lengths that can fit into a woodburning stove or cooker. The most common method of cutting up these 1 meter pieces is on a saw bench, which is a fairly quick and efficient method. Personally I have an deep instinctive fear of repeatedly having my fingers so close to an unguarded circular saw.
The alternative is to use a sawing horse and cut the wood with a chainsaw. I very quickly found this method slow and inefficient and infact on ocassions dangerous for cutting smaller round logs which can get hooked on the saw teeth of the chainsaw and spin as if they were on a lathe.
You find that you are endlessly putting logs on and off the saw horse, sometimes even resorting to secure the log with your foot to maintain it's position - some years ago I saw a Frenchman doing this very thing whilst wearing slippers!!! Each time you need to put on another log to be cut you have to put the chainsaw down on the ground. I found that all you end up with is a small pile of logs and backache.
You find that you are endlessly putting logs on and off the saw horse, sometimes even resorting to secure the log with your foot to maintain it's position - some years ago I saw a Frenchman doing this very thing whilst wearing slippers!!! Each time you need to put on another log to be cut you have to put the chainsaw down on the ground. I found that all you end up with is a small pile of logs and backache.
The cost effective alternative to the above methods is to use a firewood cutting frame or rack to pack all the logs into, then to cut through all of the logs held within the frame with a chainsaw. It takes me around 5-10 minutes to fill the frame, packing the logs in tightly, in as good a fit as possible. 30 to 60 seconds to cut through the logs depending on how many cuts are to be made and another 5-10 minutes to remove the cut wood from the frame and throw it either into the log shed or the back of the van for delivery. It generally takes me about 60 to 75 minutes to process 2 cubic meters of wood if it is cut to 50cm lengths and about 90 minutes as 33cm.
 |
| The logs are packed as solidly as possible into the frame which minimises the settlement and log movement during cutting. Any small diameter round logs are best NOT placed on the top of the stack because the teeth of the chainsaw can snag them and make them spin dangerously. |
Cutting frames like this but made of steel are available I have seen a tiny one in a DIY store in Limoges for 80 euros, it has the capacity for maybe 6 or 7 logs at a time. I also have a deep mistrust of using a chainsaw in close proximity to metal. From time to time the unexpected can occur and I would rather end up catching the structure of a saw frame made of wood rather than one of steel. A wooden frame is easy to patch up if a mistake is made, I have one that has cut well over 1000 cubic meters of firewood and it's still going strong, although it has had 2 major patch ups so far.
Materials list
For the 6 vertical parts of the frame I have used 9.90 meters of 63mm x 75mm
For the bracing cross members and support rails I have used 9.92 meters of 40mm x 60mm
approx 48 70mm wood screws
approx 20 120mm wood screws
Cordless drill with correct screwdriver bits
6mm spurpoint or twist drill bits for predrilling screw holes
Handsaw
Set square
Pencil
Permanent marker pen
Disc sander for rounding off the carrying handles (optional)
Preparation
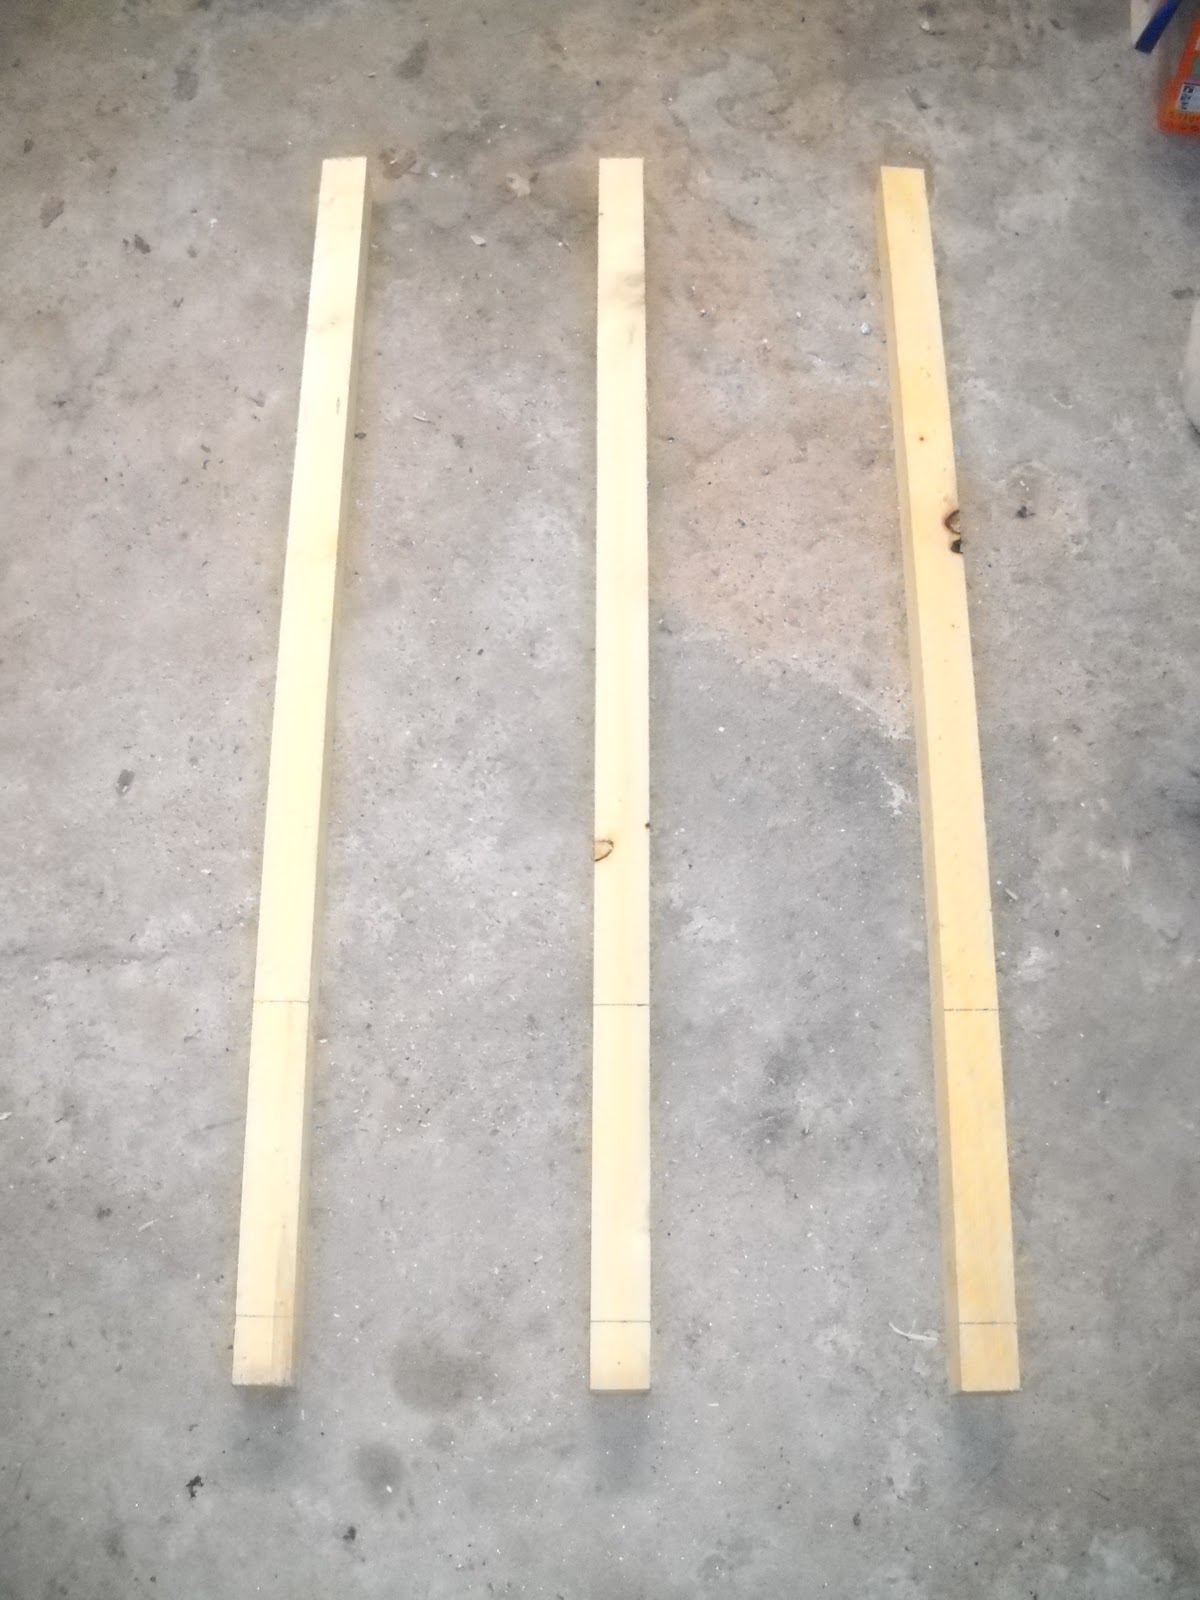
Cut 6 pieces of 63mm x 75mm into lengths of 1650mm - these will be the 6 vertical legs
Cut 2 pieces of 40mm x 60mm into lengths of 830mm - for the two lower leg bracing rails
Cut 2 pieces of 40mm x 60mm into lengths of 1430mm - for the two upper bracing rails that support the cutting bed.
Cut 6 pieces of 40mm x 60mm into lengths of 600mm - for the cross members for the cutting bed
Cut 4 pieces of 40mm x 60mm into lengths of 450mm - for additional wood supports for the cutting bed
Construction
 |
| The 3 legs for one side of the cutting frame already marked for the position of the two rails. One at 7cm and the other at 380mm. The rails sit above the marks. |
On a flat surface, position 3 of the legs parallel to each other, place the shorter (830mm) rail above the pencil mark made at 70mm. Screw the two outer legs flush with the end of this rail and position the middle leg at 390mm from the left side and drive at least 2 screws into each point where the pieces overlap each other.
 |
| The two rails attached to make up one side of the frame. The top rail sticks out to form carrying handles to enable the frame to be moved around more easily. |
 |
| The two halves laid out on the floor an exact mirror image of each other. |
Next position the cutting bed support rail (length 1430mm) just above the pencil line made at 380mm, position the rail centrally so that 300mm sticks out from each side of the outer legs on each side- these will be the carrying handles for the cutting frame to make it easier to move around. When you are happy with the position screw them into place. Remember that the rails will run on the inside of the frame. You have now made one side of the cutting frame, now you have to make the other. It is important to remember that this needs to be an exact mirror image of the first side!
 |
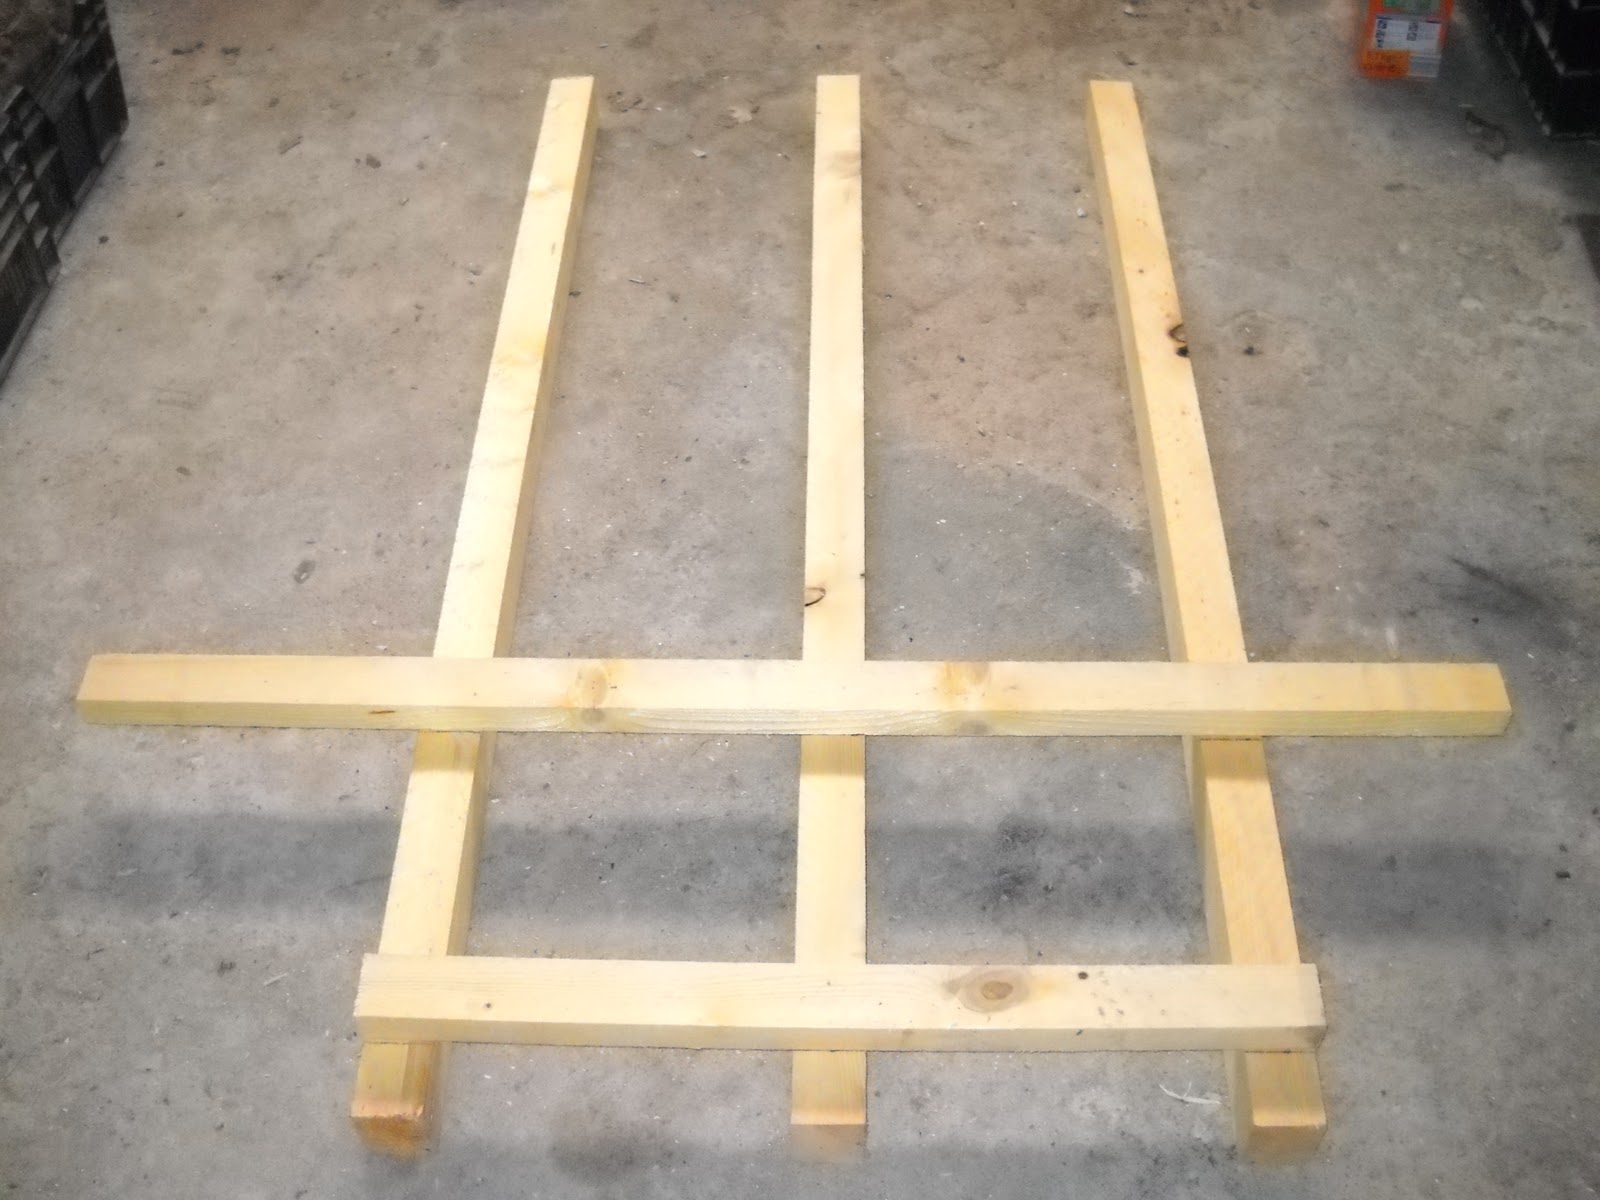
| One side of the cutting frame with the first four bracing pieces attached to join the two halves together |
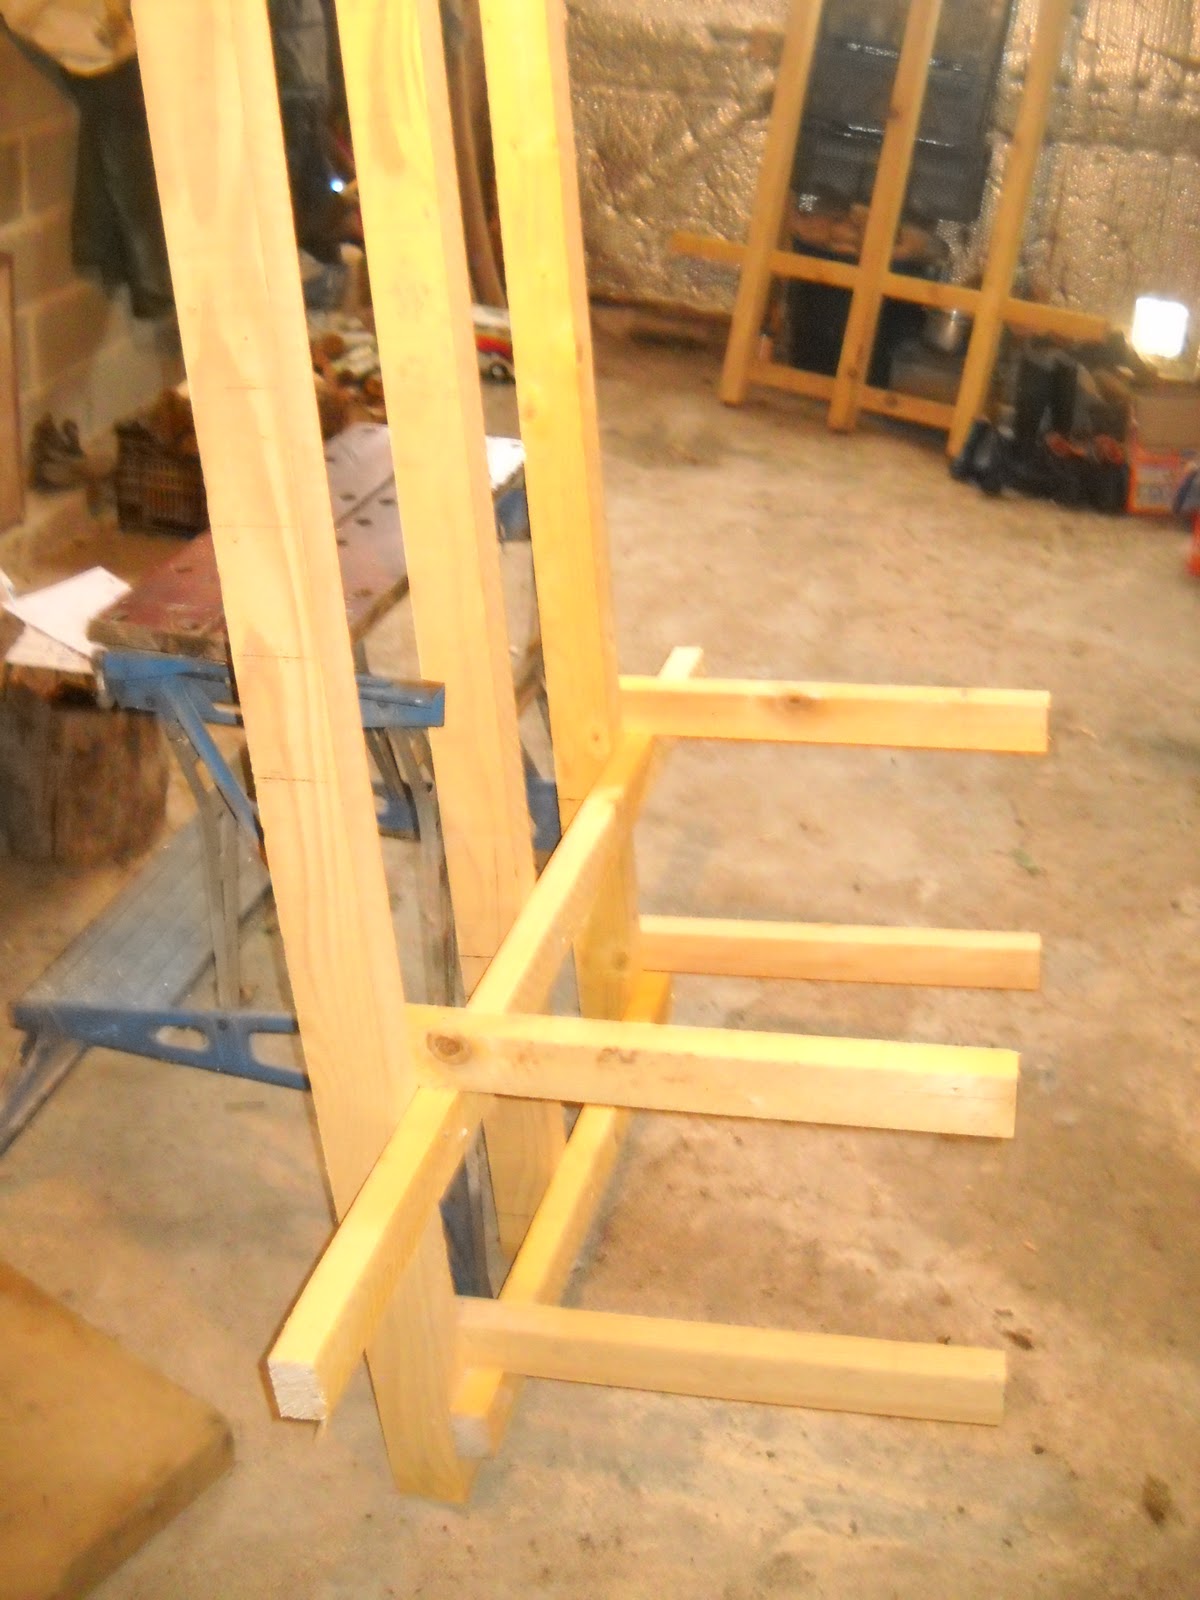
The next stage is to lean one side of the frame on something secure and with the rails on the inside attach four of the 600mm bracing pieces with 70mm screws as shown in the photo to the right and then move the other half of the frame into position and drive in two 70mm screws where each bracing piece attaches to each leg. It helps to have someone to help hold the frame sections in place, but I managed without. The frame is now stable and it is just a matter of attaching the final two 600mm bracing pieces and the four, 450mm log supports that stop the cut logs from falling through the frame when they are cut. Each of the 450mm log supports is fixed to the support rail underneath with a 120mm screw, for added security I have also placed a screw vertically down through all of the bracing pieces into their respective supporting rails.
Note -All of the short pieces are predrilled to prevent the wood from splitting when the screws are driven through them.
To make it a little kinder on the hands I rounded off the square edges of the carrying handles with a disc sander and I find them much improved and it is well worth the less than 5 minutes that it takes ( this was done after these photos were taken). Finally I marked the cutting positions with a permanent marker.
 |
| The two halves of the frame joined together. |
 |
| The finished frame with all the bracing pieces and log supports fitted. After the photo was taken I rounded off the carrying handles with a disc grinder. |
Tips for cutting your firewood
When loading the frame it is important to make sure that the individual pieces fit together in the best possible way. It is preferable to make sure that the frame is packed as solidly as possible. If it is not well packed then the logs will change position greatly when the log lengths are cut and makes it more likely for them to fall out of the cutting frame. Make sure that all the smaller diameter round logs are placed in the lower part of the frame where they will be held solidly. If they are placed loose on the top of the loaded frame then the chainsaw teeth can catch them and make them spin dangerously. I always put larger, heavier logs on the top of the frame and also any larger pieces that are of an awkward shape and do not fit well into the frame. It is not normally neccesary to secure the logs with a ratchet strap if you follow my advice, but the use of one does slightly decrease the movement within the frame when the logs are cut and give a little more security to the cutter.
Safety
Chainsaws are potentially very dangerous tools and it is advisable that anyone who operates one has had some training and is both competant and confident in their use.
You must also wear eye and ear protection and steel toe cap boots are recommened.
The chainsaw should have a guide bar long that is long enough to reach across the entire width of the cutting frame to minimise the risk of kickback.
The guide bar should be in good condition and not worn otherwise the saw will not cut stright. The saw chain must be correctly sharpened. If the chainsaw is running correctly and the saw teeth are sharp the saw will cut through the wood using only the force of it's own weight - you will not have to hardly use any downward force at all to cut through the wood.
Happy sawing - Michael
brilliant!
ReplyDeletewe will begin using this frame for coppiced black locust firewood.
thank you.
Michael- excellent. I have just build a 'rubbish' frame which I will now dismantle and rebuild using your design- I had been trying to better my efforts but did not think of more than 1 log cutting at a time. We now live in rural Australia and will be relying on wood for our heating.
ReplyDeleteMany thanks TonyT
This is actually a nice idea. I'll try to build this one to organize my firewood.
ReplyDeleteGreat minds think alike! I made an almost identical one for my annual forest trips.
ReplyDeleteAs long as I put a couple of 'heavies' on the top I find it very safe and easy to cut huge piles of firewood in a very short time.
Cheers
p.s I'll link this comment to the post I did about how I do it. Any tips?
Thank you Michael for sharing this frame design. Its going to come in handy for maintaining my 10 acres park in South France too.
ReplyDeleteCheers
David
HIO Round Firewood Log Racks from Bizarkdeal
ReplyDeleteI'm very happy with the Firewood Log Holder. The HIO 40 Inch Black Steel Firewood Log Holder came with all the hardware I needed to attach the remaining parts in about 10 minutes, which included the time it took to unpack the Log Holder from the shipping box. The wrenches I needed were also included which was a big plus because it would have taken me a while to find the necessary tools and would have doubled my time to put the unit together. The frame is made of steel and is powder coated to protect the frame from rusting. I found that the base of the log rack was solid and can easily hold all the firewood I could stack on it.
It is really nice article, It is useful information and very helpful for me....
ReplyDeletedesigner log holder
log trolley
I would highly recommend Mr Benjamin services to any person in need of financial help and they will keep you on top of high directories for any further needs. Once again I commend yourself and your staff for extraordinary service and customer service, as this is a great asset to your company and a pleasant experience to customers such as myself. Wishing you all the best for the future.Mr, Benjamin is best way to get an easy loan,here is there email.. / 247officedept@gmail.com Or talk to Mr Benjamin On WhatsApp Via_+1-989-394-3740 Thank You for helping me with loan once again in my sincerely heart I'm forever grateful.
ReplyDeleteLog Shaping Discs
ReplyDeleteare essential tools for anyone working with logs, offering smooth, precise shaping for professional-quality results. At Log Home Shoppe, we provide high-performance discs designed for durability and efficiency, making log crafting easier for both beginners and experts. If you’re looking to improve accuracy and save time on your projects, our Log Shaping Discs are a reliable choice.
Excellent woodworking tips shared here. I recently purchased Log Shaping Discs from Log Home Shoppe, and they made my log shaping tasks much smoother and more efficient.
ReplyDeleteGreat insights in this post! If anyone is looking to improve efficiency in wood cutting and processing, checking out firewood processors for sale can be a smart investment. These machines save time, reduce manual effort, and boost productivity for both small and large-scale operations. Looking forward to more informative content like this!
ReplyDelete